Tuesday, 28 February 2017

5 DIYs To Try | February 2017

I feel like it was only yesterday I rounded up January with a few DIYs to try and here we are with some fantastic DIYs and blogs that have caught my eye during February:


Knitting is my nemesis.  Luckily, Fran at Fall For DIY has this brilliant arm knitting DIY cushion cover to bridge the gap between crochet and knitting for me.  There's a fab video tutorial too that I am following step-by-step and I hope to share the results fairly soon.


This is beautiful and the technique is something I'm going to be putting in to practice for a gift fairly soon.  Club Crafted's tutorial has given me the confidence [and some great tips] to give it a go.


These are so simple, so stylish and for sure, the next flower wrap I am trying out. Love it [and the blog is a fave new find].


I mean, there's no reason to get out of the bath once you can have your wine, candles and iPad with you, is there? This gorgeous bath shelf is shared on the Love & Renovations blog and is the perfect weekend DIY.


Up-cycle some of your utensils with this sleek, stylish and simple DIY - ready for a Spring refresh!


Will you be trying any of the 5 DIYs?

[Don't forget to check out the TTSM February DIYS: Nutella Chocolates, Sequin Patches, Body & Lip Scrub & Marble Tray]
Share:

Sunday, 26 February 2017

DIY Home Decor | Serving Tray

Sometimes, the best DIY makes are quick, easy and unexpected and that’s exactly what I’m bringing you today with this display tray.  

| WHAT YOU NEED |
Wooden Tray / Grey Paint / Paintbrush / Paint Tray / Marble Contact Paper [or any pattern]

| HOW YOU MAKE IT |

As my home sorting/organising/decorating continues [does it ever end?] I have been on the lookout for a tray that I can both use to put an end to the juggling act I insist on in carrying things upstairs [rather than making two trips] and when not in use, look nice and part of the home décor.
I have re-purposed frames in to trays before [here], but this needed to be a little more functional and I needed handles.

I spotted this wooden tray in Hobby Craft and not only is the shape and size perfect, it was cheap and ready for a quick transformation that would make it what I had been looking for.

Simply, I coated the inside and out with a light grey paint, painting with the grain of the wood and spilling slightly over on to the inside base of the tray before leaving to fully dry.

To add both a decorative and protective base, I used a marble contact paper to line the bottom of the tray.  In order to ensure neat, measured lines, I cut a template slightly wider and longer than the tray before sticking to the base, removing any air bubbles and marking the sides to cut.  
I opted for a craft knife to run along the sides, but you could also gently peel the paper away and cut with scissors.  Ensure the paper is fully adhered and smoothed to remove any air bubbles.
As a final decoration and to add a little depth, I mixed a slightly darker grey to paint the insides of the tray handles.
Once fully dry my tray was ready to use and now my stairs can be free from coffee spills and I won’t have to balance under my arms, chin and neck.  
When not in use, it’s the perfect display tray in the kitchen for my coffee capsules, syrups and sugar pot.
Share:

Sunday, 19 February 2017

DIY Beauty | Body & Lip Scrub

This was a DIY around 5 years in the making.  I’ve attempted homemade face masks and hair masks in the past [some with success, others with mashed banana and avocado stuck in my hair for days], but with plenty of scrubs in the shops I was happy with, I never quite got round to making my own.  But an unsupervised detour to the soap making aisle of Hobby Craft sees a whole load of Beauty DIYs coming your way over the next few months, starting with this easy Body & Lip Scrub combo.

| WHAT YOU NEED |
Sugar / Cucumber Oil / Peppermint Oil / Containers / Spoon


| HOW YOU MAKE THEM |

This is the tip of the DIY Beauty iceberg – the colours, scents, oils and ingredients means that a whole loads of personalisation is possible and you can tailor to anyone and everyone.
For my base, I used Coconut Oil.  It’s cheap, it’s everywhere and the benefits are widely known.  A 500g jar costs around £2 and will make up 3 body scrubs and 3 lip scrubs no problem.
I scooped 1/3 of the coconut oil into a mixing jar [unmeasured as the quantities were very much altered to suit my preference] and broke it up with a fork to make it easier to work with.
My ‘scrub’ element was white granulated sugar and I added 1 cup in total, a ¼ cup at a time, mixing in with my fork and testing the consistency as I went until I was happy with the ratio.
Next, the oils and scents.  I wanted something fresh, clean and light, so opted for a blend of mint oil and cucumber oil – two caps full of each, but adding one cap at a time, mixing and testing the blend as I went.
This is the stage where you can add any colourings, additional exfoliants or even dried flowers before transferring to your chosen pots.  I picked up a selection of lip pots from the pound store and a couple of larger jars from amazon and even went as far as to create some labels [these make great gifts if you use the same oils as me, so feel free to use the ones below]. 

| LABEL |
[right-click and save to your computer to print]
I filled a lip jar with the mixture, patting down and levelling before popping in the fridge to harden the mixture.  
I then transferred the remaining mixture into the larger jar, but left this in its fluffy, lighter state.
Not only does it look and work well, it smells amazing – the perfect fresh scent for a bathroom!

Have you ever made your own beauty products? Let me know if you have any recommendations.
Share:

Sunday, 12 February 2017

DIY Accessories | Sequin Patches

Style up your wardrobe with these simple sequin patches.

| WHAT YOU NEED |
Sequin Ribbon / Fabric / Fabric Glue / Scissors / Needle / Thread / Pencil

| HOW YOU MAKE THEM |

I used a scrap piece of pre-washed thick linen to create my patches, but these can be made on to almost any material or iron -on fabric if you want to say time and sewing later on.
Using a pen or pencil, trace or draw your design on to your material.
I opted for simple lines of hearts, stars and diamonds - bear in mind the lines that you will be creating with your sequins - too thin or close together and you may not be able to neatly trace these, so open shapes work well for this.
Fill the shape with a thin layer of fabric glue [don't be too worried about being neat]:
There are a few patterns to attaching your sequins, you can create lines in any direction, but i opted for a simple trace of the outside lines, that then work their way in towards the centre.
To make cutting my patches out later a little easier, I placed the line of my sequin so that half was on the inside half was over the glue and the outside half would allow me to cut the shapes out without the fabric behind showing through.
Take your time, press your sequins down as you go and move the fabric round, rather than the sequins to stop you from getting in a tangle or losing the alignment of your sequin thread.
Keep going until your have your shape and again, don't worry if your fingers have meant the glue is a little, well, everywhere.  It can be removed once dry and no-one will ever know.
Leave to dry fully [overnight is best] before cutting away your patches.
With a little warm water on some non-abrasive fabric [a flannel/tea towel works well], you can buff away the glue to shine up your patches before sewing or gluing them on to your clothes or accessories.  I opted for sewing my patches on and added a little thread detail to the diamonds:
The patch possibilities are endless.
What would you make?
Share:

Sunday, 5 February 2017

DIY Valentines | Chocolate Hearts

Completely not just for the 14th February, but with Valentines on the horizon, you might fancy making a few of these to hand out to your loved ones.

| WHAT YOU NEED |
Wiltons Candy Melts / Nutella / Hazelnuts / Dried Strawberries / Heart Mould / Piping Bag / Spoon


| HOW YOU MAKE THEM |

There are quite a few elements to this foodie DIY, but luckily, the time is all in the preparation and once you start, finish time is only 30 minutes away.
Start with lining your moulds - coat the inside with your melted candies and by the time you finish the last heart, the first will have dried, so give a second coat to ensure a thick layer of chocolate lines the moulds.
It's not pretty - but don't worry - it will all be hidden.
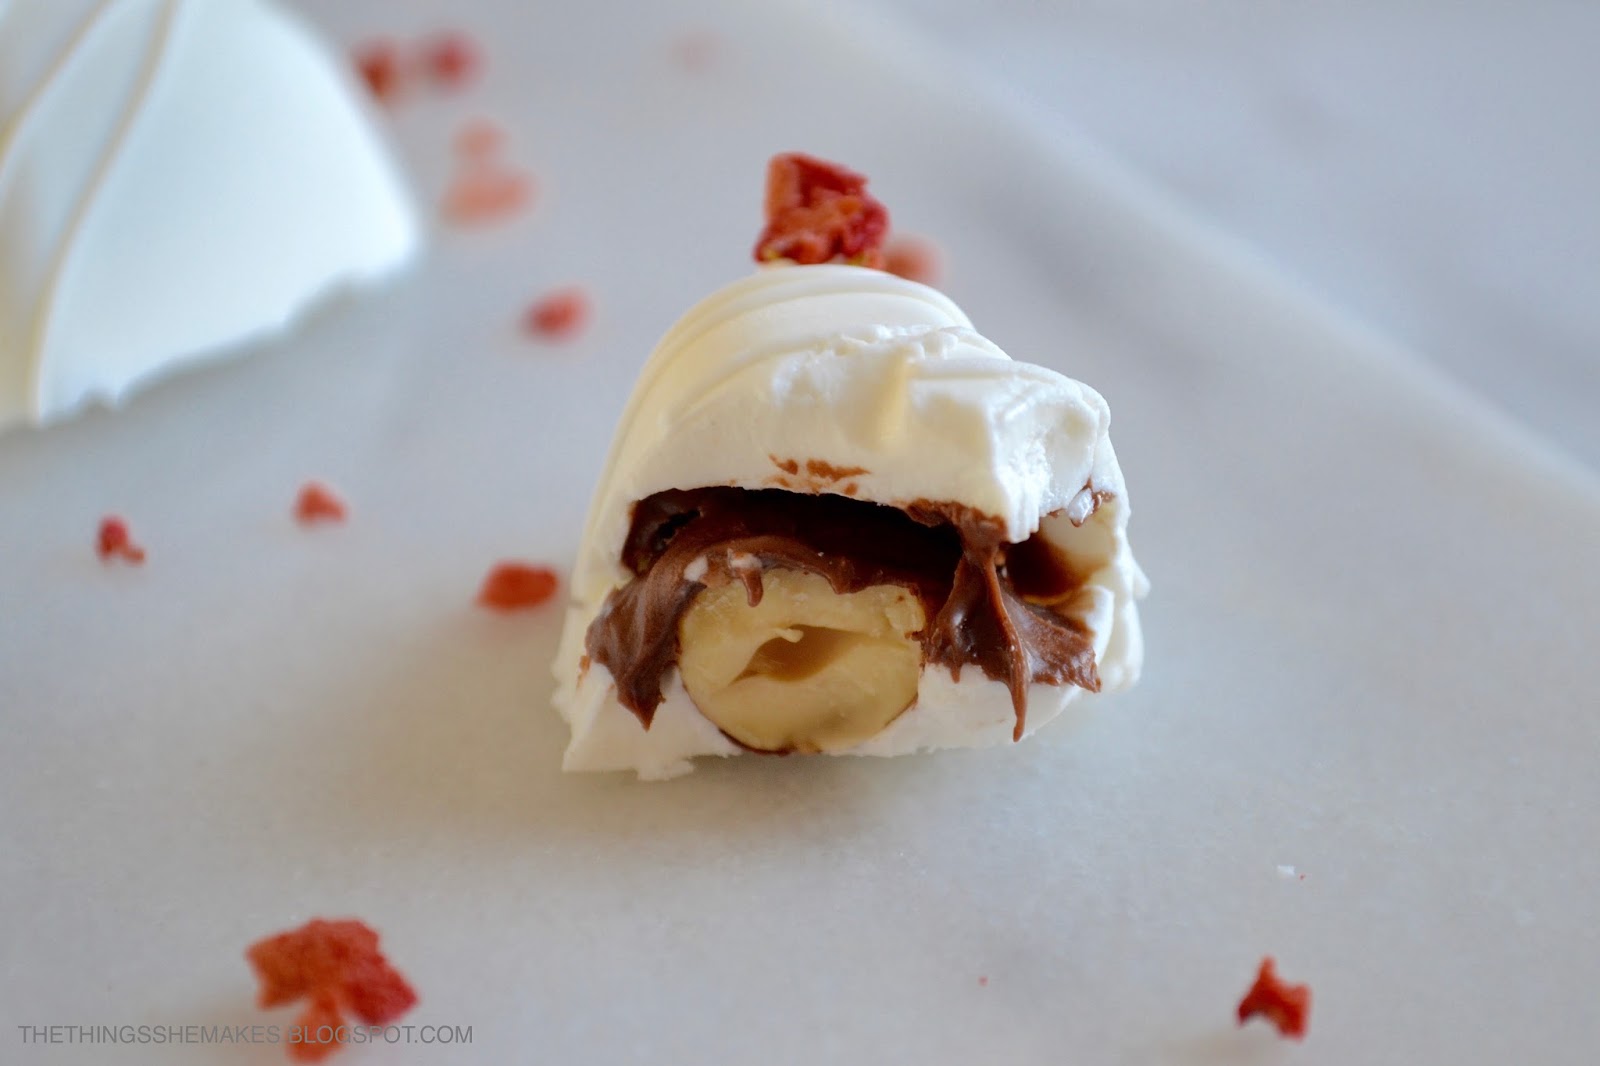
Add a spoonful of Nutella to a piping bag and fill the centre of each heart, around the size of a hazelnut, before adding an actual hazelnut, pushed down as far as it will go:
Fill the remainder of your heart mould with more chocolate and tap the mould on your surface after each is filled to level your chocolate.
Once set, remove from the moulds and line up for decorating.
I added the remainder of my Candy Melts to a piping bag and cut the smallest hole at the end to pipe squiggles across each one:
...before adding a small round of chocolate at each corner to decorate with some dried strawberry pieces:
[be quick with your chocolate - as it dries so quickly - you may need to scrape the chocolate at the tip of the piping bag out at intervals! Don't worry, you can easily do this from the outside of the piping bag with your finger, without damaging the bag]
And you are finished.  Add to a bag, box or have as an addition to your coffee.
Candy Melts do have a slightly different taste than our usual Dairy Milk, Galaxy, Milky Bars etc. so feel free to substitute - just temper your chocolate and allow additional setting time.
I also made solid versions of these, perfect for adding to hot chocolate.
Happy Sunday x
[P.S - catch the 5 Valentine-themed DIYs I think you should give a go here]
Share:
© The Things She Makes | All rights reserved.
Blog Design Handcrafted by pipdig