Friday 30 May 2014

Lion Moneybox

Make pocket money savings a little safer with this simple craft - using a Decopatch figure 
and can of spray paint.  
Share:

Wednesday 28 May 2014

Alphabet Magnets

 Starting as I mean to go on this week, todays post is super quick and super easy, with pretty much no tutorial required - the result of what started as a magnetic noticeboard makeover, but for now, has been a makeover of the magnets.  
Share:

Monday 26 May 2014

Glitter Foam Party Decoration

Todays post is perfect for Bank Holiday reading - a simple, quick and easy craft that makes a fantastic decoration with impact - no glue, sew, time [or much effort] required!

Share:

Friday 23 May 2014

White Chocolate Croissants

During the week, I am a terrible breakfast person.  It is always grabbing an apple/banana that I eat on the short walk to the train station, followed by much coffee as soon as I get to the office.
At the weekends, it's a different story [mainly beacuse breakfast is at 11am and I can organise myself by then].  One of my favourites is a Bacon and Brie Twist, but adding to that and a Bacon Sandwich, I'm all about the croissant.  The white chocolate croissant.  As it's bank holiday weekend, why not treat yourself with this calorific, sort-of-handmade breakfast/lunch/dinner/snack?  

Share:

Wednesday 21 May 2014

How to Make a Ombre Cord Curved Bar Bracelet

I'm still working my way through that to-do list and this is a contender for the longest-standing project.  I've had the components for this for 2 years.  2 years! - and it took no more than 20 minutes of my time, so I have no idea what my excuse is - it also explains my colour-combo choice, as for this time of year, I'd be choosing some pastels instead - next trip to craft city, I'm making these for Summer.

Share:

Monday 19 May 2014

White Pleather and Gold Phone Cases

Earlier this year, I made some changeable paper and card case designs, with a clear case [which I decorated with gold nail varnish and glitter, obvs.] and today, I have another personalised phone case project, that is a little more permanent and incorporates my favourite colour combinations [white & gold] with my favourite fabric [pleather].

Share:

Friday 16 May 2014

Hanging Banner

Last month, I posted a cake topper DIY, which was in the style of a mini banner.   Today, I am supersizing the deal with this hanging banner for the hallway to seize the day and give me a bit more purpose, rather than early morning stumble, in my step.

Share:

Wednesday 14 May 2014

DI Spring Swap

Hello! I'm sharing the second of my craft swaps this month, this time, the fab Dainty and Ivory hosted.  
The theme for this swap was Spring and this collection of crafty I recieved screams of it:
Stickers, embellishments, washi tape and pretty pen - perfect for crafting with alongside my cup of tea!
Then I opened three smaller packages and each contained a beautiful pair of handmade earrings:
I love the colours of the beads and combinations used - love them!
My swap partner wrote that she hadn't made much since having children - but I hope this is the start of making much more [P.S - open an Etsy shop]!

I don't know who sent my swap, but I thank you so, so much if you're reading!  I sent a Spring package to Hannah, which she wrote about here, do go and say hello.
If you've ever been tempted by a swap, I highly recommend - it's a great way to share a bit of crafty, feel-good and meet some other fab bloggers.

You can also see how I made some of the gifts for my swaps: Sequin Tote Bags and Spring Folders:
see you next time x
Share:

Monday 12 May 2014

How to Make a Speech Bubble Noticeboard

Previously, I have made pins to try and make my noticeboard a little less 'blah', until I realised my noticeboard was the problem.  Project DIY!

What I Used:
Corkboard Roll [£9.99 HobbyCraft]
Scissors / Pencil
Gold acrylic paint / paintbrush
SPeech bubble print out

The corkboard comes in a roll - but you could also recreate this project with any noticeboard, removing the frame - perfect way to up-cycle or make over something you may already have:
This roll was fairly thin, so depending on your pins, you may want to 'double-up' your corkboard layers to make sure you don't end up pinning everything to the wall as well!


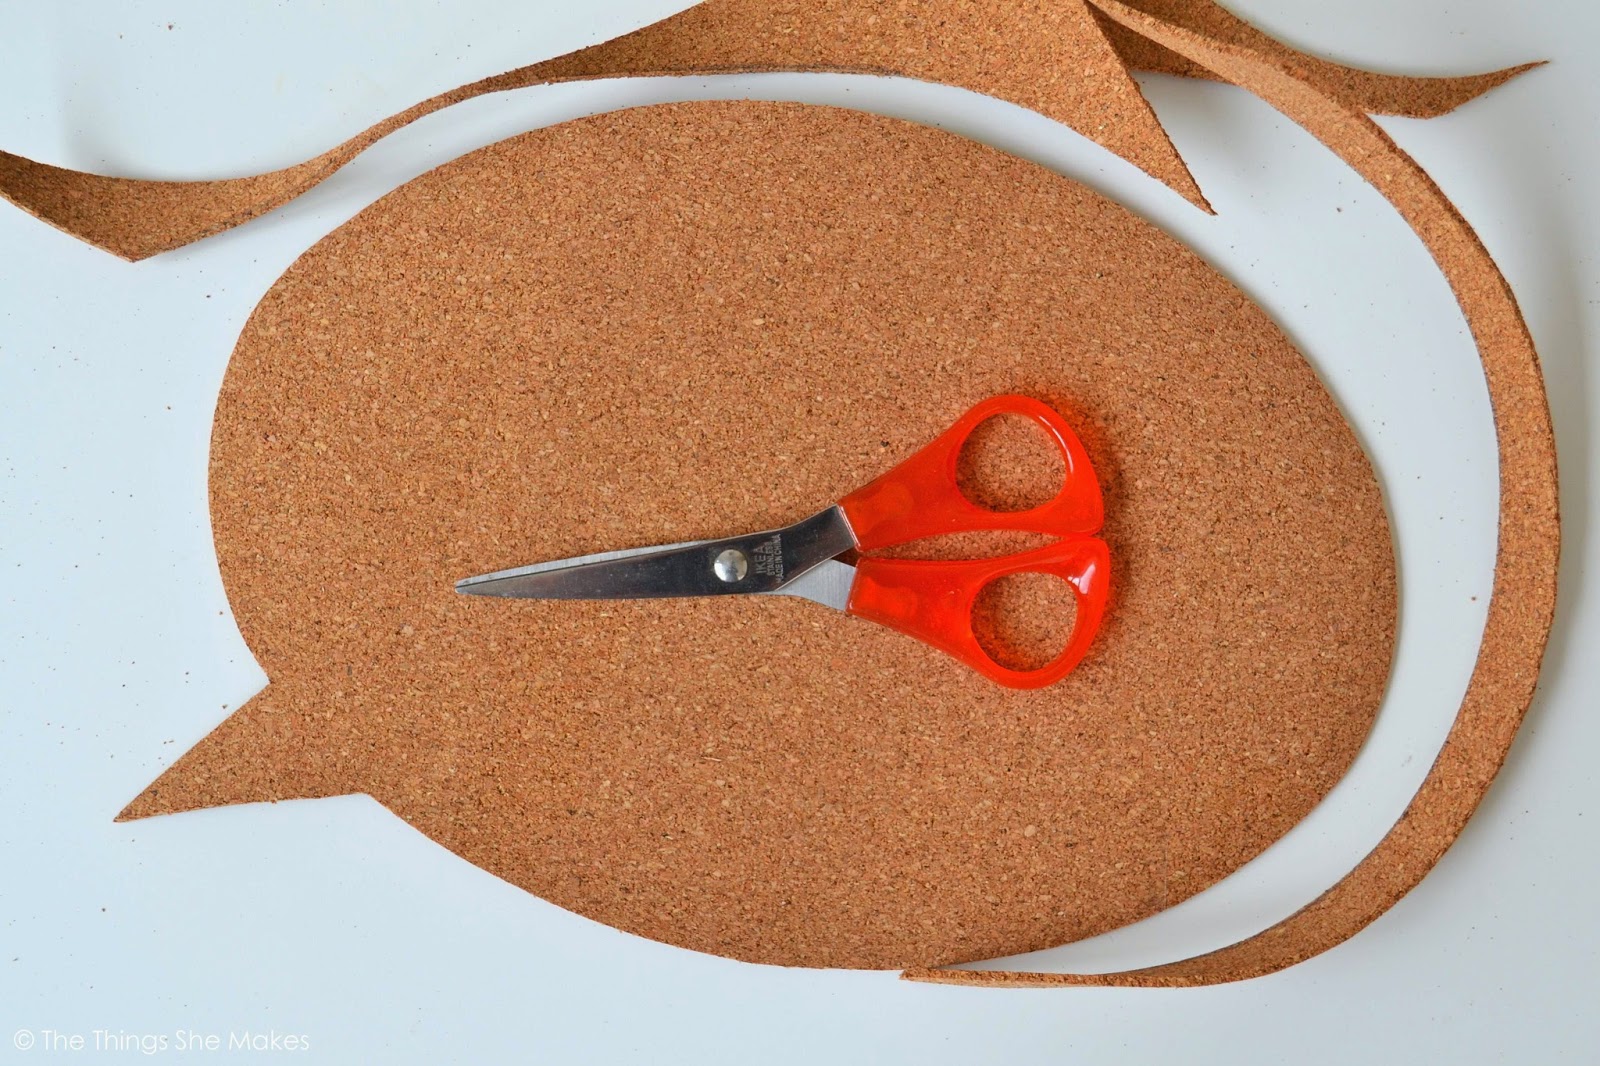
I started by printing and cutting out a speech bubble of the size and shape I wanted [you could also draw this free-hand] and traced the outlines on to the corkboard in pencil:
The corkboard is thin and flexible enough to be cut with scissors, but do be careful that you bend the scissors around the coarkboard for any hard angles.  If you bend and twist the coarkboard, it will tear - but if this does happen, you can fix this with a little strong glue:

Once cut, the coarkboard was a little moulded to the roll, so a few heavy books and a film later, I began sketching in pencil the 'hello' I wanted for the centre of the noticeboard:
To make the wording stand out, I used basic acrylic paint [in gold, of course], a cheap paintbrush and traced over the pencil marks with a good coating of the paint:
Once dry, top up any sparse or any areas that need a little extra definition:
...and you are good to go!  
Attach to your wall, either with removable frame hanging strips [my favourite weapon of choice as a renter] or if you use corkboard roll, blue tac can be just as strong.  Simple and easy way to make a statement -
looks just as good with no pins as it does with.
 A little cluster of these with various sayings would look fab and, for a list-maker like me, would be the perfect place to collect my to-dos.  Whatever your colour scheme, these could be personalised - I'm making some more of these for my god-daughters with their names on so they can separate their bits and bobs [drawings and stickers] on their own noticeboard.
[DIY your pins here and here]
see you next time x
Share:

Friday 9 May 2014

Paper Cut Map Art

The weather [for the most part] is warming up and I cannot help but think of holidays now.  Travelling is one of my most favourite things to do, whether a quick city break or long adventures, so I'm pretty keen to have a few more travel-themed pieces of art on the wall.  I thought I'd start with a simple map mount for any picture to sit behind.  I travelled Australia [scarily nearly 10 years ago!], so this was my choice of design.

What I Used:
A4 sheet of white card
Printed Map / text
Craft knife / pencil / cutting mat / tape

I found a google image that gave me simple, but still defined outlines and messed about with it a bit to get an A5 size printed:

With a hard pencil, I traced the outlines of the images I wanted to transfer:
...and placed the image face down on to the back of the card that would be my mount.
With a soft pencil, I scribbled over where the traced lines were to transfer them, reflected, on to the back of the card [this would mean after cutting out the image, the correct side, without pencil marks would not be back to front!]:
Now, the fun begins.  Craft knife time and patience time.  Australia does not have rounded shores.  I started section by section, keeping the lines as close to those used as a template as possible:
....until the image was completely cut away, smaller Fraser Island, included:
For the background, some beautiful print fabric or a photo would be perfect, but until I can decide, I made a temporary text background on the computer:
...all fastened in place with a little washi tape:
I'm embarrassed to say it was hanging for a good 30 minutes before I spotted my mistake:
....had I not gone to the effort of reflecting the image so the pencil marks wouldn't show?
*blushes*
Have a great weekend - I think I need one.
see you next time x
Share:

Wednesday 7 May 2014

Experiments with Fimo: White and Gold Bowl

Whilst searching in the Kids Craft section for my Shrinkies experiment I blogged about on Monday, I also came across another section of childhood crafting: Fimo.  I used to love fimo, but Have absolutely no idea what I made with it - I think I used it similarly to clay, making figures and a general mess.  I plan to use the fimo to make beads for jewellery, but before jumping straight in to that, I decided to get used to using it again by making a little trinket bowl [you know I love a trinket bowl].

Share:

Monday 5 May 2014

Experiment with Shrinkies: Eiffel Tower

With no huge 'projects' on the go at the moment, I've been experimenting and trying out ideas that are fairly new to me and I have finally got round to something that sent me back to Year 5 crisp packet keyrings: Shrinkies.  Annoyingly found in the kids section of my HobbyCraft, I have been missing out!

What I Used:
Shrinkies Crystal Clear [£4 HobbyCraft]
Sharpies Pens: Black, Brown, Gold, Bronze
Scissors
Printed Image

There are a number of versions of the shrink plastic that you can buy, white, coloured and my weapon of choice, clear.  A pack of six 262mm x 202mm sheets cost £4.00.

Taking no risks, I traced the outline of my Eiffel Tower from a printed photo [recognise it from this?]  I was pretty worried about drawing straight on to the plastic with permanent pen, but tracing rather than free-hand gave me a bit less to worry about.  I chose three Sharpie shades to create my Eiffel Tower:
The dark brown was used for the main lines on one side of the plastic:
Then the design was turned over to decorate:
....gold and rose gold for the detail:
...and black for a bit of definition:
Once I was happy with the picture, it was time to cut the shape from the plastic. I left a generous 1cm gap and tried to follow the shape of the Eiffel Tower as I cut, rounding corners to prevent any sharp edges.  This was fine, until I came to some slightly trickier areas:
The plastic is thin and I found it would tear if I tried to bend the plastic around my cutting, rather than move my scissors around the plastic:
I tiedied the tears up by cutting as close to the drawing without loosing the uniform gap I'd created - but for the future, I think I'll stick to straight lines where I can or take better care with smaller scissors that will give me more flexibility, rather than rely on the flexibility of the plastic!

Cutting out done, I places the Eiffel Tower on to a lined baking sheet and popped in the oven hesitantly at 175 degrees C.  The instructions had warned the plastic twists firsts, shrinks with a bend and then settles: 
Shutting the oven door, I sat and watched................as nothing happened.  Unsure of how long it would take, the process depends on the size of the plastic you have put in the oven.  After 5 minutes, I went to check the instructions and no sooner had I turned away and returned, my Eiffel Tower had turned in to this!
I didn't get to see the bending and twisting!  I didn't get to panic it had all go wrong! I didn't get to see it shrink!  Magic. 

What happens now? Is it done? Do I take it out before it melts? I decided to turn off the oven and leave the Eiffel Tower for 5 minutes to cool down, but couldn't stop myself from checking it every minute as it did so.  Shrinkies plastic shrink to 7 times smaller and 7 times thicker than the sheet you start with.  It's pretty hard to scale that in your head when creating the picture, but for reference, the A5 Eiffel Tower I created ended as a 6.5cm Eiffel Tower - but look how it keeps the detail:
I wasn't sure when colouring the design how much would hold, show up and whether the 'baking' process would melt it all away, but I'm amazed at how it has all stayed and still shows:
...and the tears in the plastic made during the cutting out process have pretty much blended:
...I'm pretty fascinated by the stuff.

Future versions of these are becoming cake toppers, stationery/noticeboard supply embellishments and little layered accessories for an idea I hope to share soon.  Go buy some.

see you next time x

P.S - As you read this, I'll be running a Half Marathon in memory of my nephew, George - please send me sunshine and fast running vibes!
If you'd like to sponsor me (Sophie), we have raised an incredible amount for SSNAP, who fund the Neonatal Unit at John Radcliffe, Oxford.  Any donations will help support the lives of babies, like my nephew: http://www.mycharitypage.com/GeorgeStansfield/
Share:
© The Things She Makes | All rights reserved.
Blog Design Handcrafted by pipdig