
What I Used:
Grapefruits
Oranges / Satsumas
Apples
Lemons
Limes
Ground Cinnamon
Hello, how are you? We are here, in the week before December. You can't avoid it [though like me, I hope you don't want to] - Christmas is starting and slowly making its way to taking over all the shops. This weekend, my decorations come down from the loft and I am going to the Dorchester for Christmas Afternoon Tea with friends [and a Christmas choir - so excited!] Over the weekend and this week, I have been preparing for something I hope to make soon - a Christmas dried fruit wreaths and hanging. I dried some sliced oranges last year [that truth be told, were sliced too thinly] and used them to decorate, but not just for the look - they smell of Christmas and last for the whole season, so this year I am adding some more fruits to the mix and adding a bit of spice.
Oranges, satsumas, lemons, limes, grapefruits and apples:
 The key thing you need is a sharp knife. Last year, this is where it all fell apart for me and I had hacked slices, rather than nice, clean ones - so I've learnt my lesson and I've also cut everything to a thickness of around 1/2cm to try and prevent any tearing / breaking later down the line.
I cut slices from a bag of oranges [4 in total] and a large bag of apples [6], 1 lemon and 1 lime and lastly, 1 white grapefruit and 1 pink grapefruit:

 To add a little variation, I also used satsumas [4 in total], which I have cut in to at quarters, but not completely all the way through, so that the fruit still holds in shape. Start your cut around 1 cm from the top, cut through the fruit and finish your cut around 1 cm from the bottom.
I then did the same to 1 lime and 1 lemon:


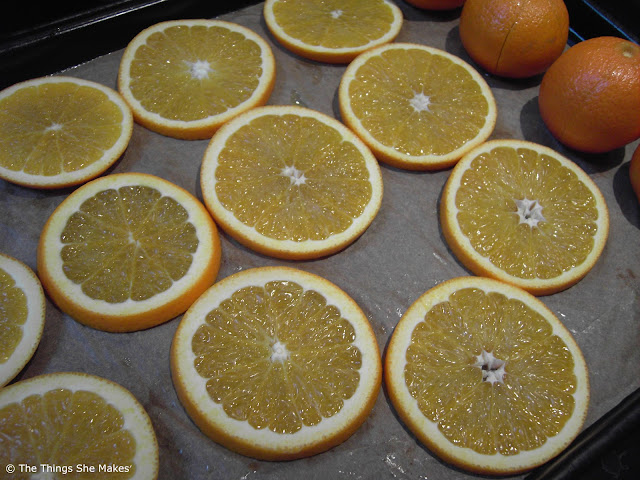
Once cut, blot each slice with kitchen paper to help dry them out and lay flat on a tray lined with baking paper to help stop the fruit sticking when drying.
 To some of the orange slices, I added a light sprinkle of ground cinnamon:

Next, I decided to pop my slices and start the drying process off a little quicker into the oven at a low heat. The length of time you need in the oven will depend on the oven you have and how dry you blot your slices to be before baking. I baked my fruit at 90 degrees C and kept them in the oven for 4 hours. Turn your slices half way through or each time you check on them. Once they looked and felt dry and spongey, I took them out to move to the airing cupboard. By this point, they will smell AMAZING.
[Popping your fruit straight in to the airing cupboard or on top of the radiator for the week after slicing and blotting will work just as well, but take a little longer than helping the process along in the oven].


 I can't wait to get started. Are you doing the same? I'd love to see them.
And of course, these are not just for Christmas, these are hopefully going to be hanging around the house until they need replacing [which judging by last years slices, will be well in to a year].
Updated: Part 2 can now be found here.

Oranges, satsumas, lemons, limes, grapefruits and apples:

I cut slices from a bag of oranges [4 in total] and a large bag of apples [6], 1 lemon and 1 lime and lastly, 1 white grapefruit and 1 pink grapefruit:


I then did the same to 1 lime and 1 lemon:


Once cut, blot each slice with kitchen paper to help dry them out and lay flat on a tray lined with baking paper to help stop the fruit sticking when drying.


Next, I decided to pop my slices and start the drying process off a little quicker into the oven at a low heat. The length of time you need in the oven will depend on the oven you have and how dry you blot your slices to be before baking. I baked my fruit at 90 degrees C and kept them in the oven for 4 hours. Turn your slices half way through or each time you check on them. Once they looked and felt dry and spongey, I took them out to move to the airing cupboard. By this point, they will smell AMAZING.
[Popping your fruit straight in to the airing cupboard or on top of the radiator for the week after slicing and blotting will work just as well, but take a little longer than helping the process along in the oven].
...and this is what they look like now - ready to be threaded and hung - I hope to have some time to do this later in the week and will share the results with you. They smell fantastic and look pretty good too.


And of course, these are not just for Christmas, these are hopefully going to be hanging around the house until they need replacing [which judging by last years slices, will be well in to a year].
Updated: Part 2 can now be found here.
Don't forget, you can follow me on Pintrest:
and Twitter!
You have some measurements in cm and some in inches; and your bake time of 2/3 hours was unclear. Can you edit the article to clarify those points?
ReplyDeleteYour Finished project was lovely and the tip on varying the widths of the cuts was a good one.
Hello - Thank you so much and thank you for your points - I have amended the post and hope that I have clarified the areas that were confusing - if there is anything that is still unclear - please let me know!
DeleteThis looks amazing..I cannot wait to make these.thank you so much :)
ReplyDeletethis is such a wonderful addition to your seasonal decorations...
ReplyDeleteI love this idea... but i do have a question....
Once you have your finished slices ... how long do they last??
I think this is an informative post and it is very useful and knowledgeable. therefore, I would like to thank you for the efforts you have made in writing this article. best place to buy nuts online
ReplyDeleteThanks for taking the time to discuss this, I feel strongly about it and love learning more on this topic. If possible, as you gain expertise, would you mind updating your blog with extra information? It is extremely helpful for me. buy nuts online
ReplyDeleteNice blog. It is very useful and informative. Thank you.
ReplyDeleteDry fruits and nuts
Buy Indian Spices Online
Best Organic Brand In India Nimbark is a specialized company for producing organic products with an experience of more than years. We are serving people with our organic products and helping in keeping mother nature safe and fertile.
ReplyDeleteNimbark provides premium quality with the exotic Kashmiri Kesar range direct from Kashmir. We also provide the essential Kirana items which are fully organic. Get morning breakfast cereals tonight dinner items with an organic snack range and superfoods from us at 15% off.
ReplyDeleteGreat post. I find out some thing very complicated on different blogs everyday. But your blogs are dam good with great information. In addition, I am share a one informative site about digital marketing. Search engines recommend SEO efforts that benefit both the user search experience and page’s ranking, by featuring content that fulfills user search needs.
ReplyDelete